Action Photography -- an article courtesy of Photographic Magazine, August 2003
![]()
|

|
|
|

|
Action Photography -- an article courtesy of Photographic Magazine, August 2003
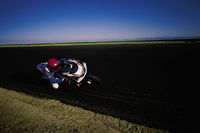
Timing isn't just about the subject. It also means considering the subject in its environment. Thus, planning comes into play, as well as practiced reactions. Here, the photographer set up trackside with this image in mind, and managed to shoot with the cycle in the right spot (it took several tries as the cyclists lapped the road course to nail one with the subject in the right spot, including its full shadow). Photo by Mike Stensvold
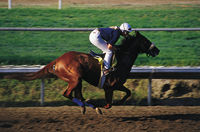
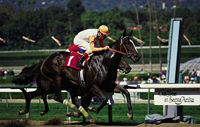
A fast shutter speed and perfect timing answer an old question: Can a galloping horse have all four hooves off the ground at the same time? Photo by Lynne Eodice
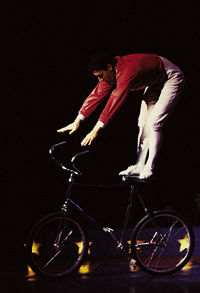
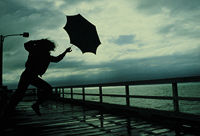
Perfect timing—not! In fact, nothing in this photo is even moving. Action can be implied, as well as real. Keep your eyes open for possibilities. Photo by Mike Stensvold
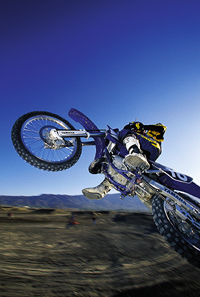
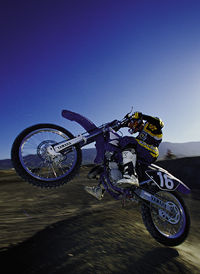
Moving in close with a wide-angle lens can produce really dramatic shots, but can be hazardous and is best left to the pros (both photographers and subjects). Photo by Ken Faught / Dirt Rider Magazine
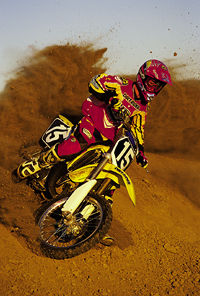
Here's a great example of an excellent point of view—no distracting elements, excellent lighting (note detail in the rider's face), no obstructions. You can be sure the pro who shot this didn't just happen to be there when the subject came by—he scouted camera spots, and considered lighting, background and access long before the action began. Photo by Karel Kramer / Dirt Rider Magazine Tips and ideas to improve your action photos You need two things to get good action photos: some basic action-shooting skills, and some knowledge of the activity you're photographing. The skills include panning, peak action, follow-focusing, prefocusing and developing a sense of timing. The knowledge helps you anticipate those perfect peak moments that make for great action photos. It does take some practice to perfect the techniques, so once you read about how to do it, go out and practice, and practice some more. Soon you'll become proficient, and you'll have some great action photos to show for it.
Timing
Timing is a key element in great action photography. If you shoot at the right moment (actually, just a beat before, to give the camera time to react), you'll get a better shot than if you miss the moment. The secrets to good timing are knowledge of the sport you're photographing, practice, and good luck. If you know the sport and the techniques are second nature, you'll find that luck will come your way a lot more frequently. You'll see those key moments developing, and be ready to capture them when they occur.Study the sport(s) you want to photograph. Look at photos in sports magazines, and watch the sport on TV. Think about the pictures you like, and why you like them. Then go out and practice shooting those types of photos. Of course, you'll come up with other neat photo ideas as you shoot, but this will give you a good starting point. And keep in mind, sports aren't the only source of action photos. Pets and wildlife are good sources, and photojournalists must be ready to capture fast-breaking moments, too.
Point of View
A large part of successful photography is being in the right place at the right time. In part this is a matter of luck. But often you can tilt the odds considerably in your favor, especially with sports (rather than with more-random-moving animal and breaking news subjects).The first step in getting a great action photo is finding a good place for your camera. Where you put your camera is where you put the viewer of your photos, and if you bring the viewer into the action, your photos will be more successful. A good camera position is one that gives you a clear view of the action, keeps you out of harm's way, provides a pleasant backdrop for the photos, and works with the lighting at the scene.
Before the event starts, walk around the location and look for suitable shooting locations, taking into consideration access to subjects, the background, the lighting and your personal safety. At some events, you can get right up front, while at others you can't. Either way, find a site with as clear a view as possible of the subject(s). Rule No. 1 about point of view is: Don't get in the way, where you might interfere with the action, or get hurt. A little common sense helps here.
At races, there is generally more action at the corners, where the cars bunch up as they slow down. At a baseball game, you might focus on first base for an inning or so, then try the batter's box for a while, then the pitcher's mound, and so on. Whatever the activity, go for the location with the clearest view of some likely excitement, and focus in on the anticipated scene of the action.
It's hard to get access to the best camera spots at professional sports events unless you're a pro with a photo pass, and even then, you'll have to fight for those spots at popular events. But that doesn't mean you can't shoot good sports photos. Try taking pictures at kids' and school events. Often you can find a good place for your camera with no special passes. Once you've put together a portfolio of good sports shots, you can approach bigger-time sports facilities and ask for a pass.
While "small-time" sports lack the big names and glamour of pro events, they provide lots of great photo opportunities. Kids might not be as polished in their skills as the pros, but they try hard, and there's plenty of action. You can capture emotional images that show every bit as much drama as any in the pro sports world. And you don't need those exotic supertelephoto lenses at such events—you can get many great shots with focal lengths from 35mm to 135mm, a range found on many point-and-shoot cameras.
By shooting "small-time" sports, you can master focusing and tracking a subject with the camera, and develop a good sense of timing. Practice makes perfect (or at least, professionally competent), and you can get it—and some great photos—at kids' sports events. You can find such events at local parks and recreation areas on almost any weekend. The specific sports will vary with the season, but during a single year, you'll encounter football, soccer, baseball, basketball, track and field, tennis, swimming and more. During winter, the local skating rink or ski slope can provide lots of photo opportunities. Buy a pit pass at a local auto race track, and you can probably find a good spot to shoot action (but check with the officials to be sure you stay out of danger).
Once you've found a safe spot for your camera with a good view of some action, it's time to check out background and lighting. It's really hard to thoroughly examine everything in your composition in the heat of the action, but you can do it at your leisure beforehand. Decide at which point(s) you want to shoot your subject, then check out the background and lighting. If there are distracting elements in the background, do something about it: Move the camera so those elements are no longer in the picture, or plan on shooting at a wide lens aperture to throw the background elements so far out of focus that they won't distract in the photograph.
Next, check out the lighting. Outdoors, the sun is generally the main light source. If it's early or late in the day, you don't want to set up shooting into the sun. While backlighting can be dramatic, it's not ideal for most action shots, and can cause lens flare. A thin overcast produces more even lighting, but reduces the overall light level, requiring slower shutter speeds or faster film. While you generally want to avoid harsh direct sunlight for portraits, it can make for colorful action shots—and is bright enough that you can stop action with the slower, finer-grained films, and benefit from their generally richer colors. Watch a few subjects pass through your selected shooting area, and see how the lighting affects them.
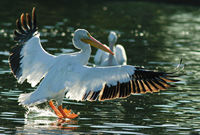
Here, the photographer just stood behind a family that was tossing bread crumbs into the air to feed the gulls. A 28-105mm zoom at 105mm, and continuous predictive AF mode caught a lot of sharp, unobstructed shots. Photo by Mike Stensvold
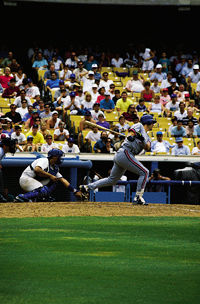
Consider camera angles when scouting shooting locations. At a baseball game, field-level shots are have more impact than high-level shots that show the typical view seen by spectators. You can't always get ideal photo access at pro sports events, but often can at kids' and amateur events, so those are great places to perfect your techniques. Photo by Lynne Eodice
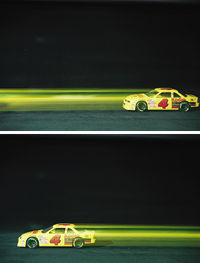
Our eyes see at a "shutter speed" of around 1/30 second. So images of moving subjects shot at 1/30 or thereabouts look "normal." Photo by Mike Stensvold
If we shoot at a faster shutter speed, the camera freezes the motion is a way our eyes can't.] Photo by Mike Stensvold
If we shoot the moving subject at a slower shutter speed, the camera blurs the motion in a way our eyes don't. Photo by Mike Stensvold Shooting Techniques
There are two basic ways to deal with an action subject: freeze its motion by shooting at a fast shutter speed, or blur it by shooting at a slower shutter speed.How fast a shutter speed do you need to freeze a moving subject, and how slow a shutter speed do you need to appropriately blur one? That depends on the speed of the subject, its distance from the camera, its direction of travel, and the focal length of the lens you're using. The faster the subject, the closer it is to the camera, and the longer the focal length, the faster the shutter speed required to "freeze" its motion. A subject moving directly across the field of view (from left to right or vice versa) will require a faster shutter speed than one moving directly toward or away from the camera at the same speed.
The best way to learn the best shutter speeds to use for a given subject is to try different shutter speeds, and keep notes. Then look at your pictures and your notes, and see which shutter speed(s) produced the results you like best. As a very general rule, shutter speeds of 1/1000 or faster will freeze most sports action, and shutter speeds of 1/15 or slower will blur it. Shutter speeds in-between (which include the whole range on many point-and-shoot cameras) might or might not freeze action subjects—it depends on the subject and what it's doing.
There's a very effective way to show motion and have the subject appear sharp: Use a slow shutter speed and pan the camera to track the subject while you shoot. Stand facing the spot where you want to shoot the subject, and rotate your body from the waist up to point the camera toward the approaching subject (keep your feet firmly planted). Smoothly move the camera to follow the subject, so that the subject remains in one spot in the viewfinder. Gently trip the shutter as the subject reaches the desired spot, and continue to track the subject for a beat—don't stop panning as you trip the shutter. With this technique, you can get a sharp image of the moving subject, while the slow shutter speed really blurs the now-"moving" background. The effect will really emphasize the subject's speed.
An effective variation with subjects such as runners, bicyclists, basketball players and the like is to mount the camera on a tripod and shoot at a slow shutter speed to partially blur their motion. Experiment with different shutter speeds, starting with 1/30, and try panning with the subject. You'll get some interesting images, with arms and legs blurred more than the bodies.
Like any camera technique, panning will seem difficult when you first try it, but you can master it with practice. And you do have to practice if you want to master it. Just reading about it won't do the trick. (Don't get discouraged if your first attempts don't "pan" out...you will get good at it with practice.)
Another way to get a sharp image of an action subject at a slow shutter speed (especially handy in dim lighting conditions) is to shoot at the peak of the action—that point where a rising subject momentarily stops before starting back down. This offers an additional benefit, in that peak-action moments are often the most dramatic, too.
Focusing on Action Subjects
To say that it's not easy to focus on rapidly moving subjects is an understatement. One trick the pros use when possible is to prefocus on a point they know (or anticipate—here's where that knowledge of the sport really comes in handy) their subject will cross, then shoot as it arrives there. This is much easier than trying to focus on a rapidly moving subject while simultaneously trying to smoothly pan the camera. Prefocusing works well with auto races (focus on a spot on the track) and baseball games (focus on one of the bases), but is less useful with more random-moving sports like football and soccer.If you can't prefocus on the subject, you'll have to follow-focus on it as it moves. Birds in flight make great practice subjects—if you can track and focus on them, you can handle most moving subjects.
Autofocusing can make action shooting easier. But you have to keep the subject in the AF target area in the viewfinder, or the camera won't autofocus on it. Practice (neighborhood kids and pets make good practice subjects), and you'll develop a knack for focusing on moving subjects, and accurately tracking them with the camera.
The best AF mode for action shooting is continuous predictive AF (assuming your camera has it). With predictive AF, the camera takes successive focus readings of the moving subject, and from these, calculates its speed and direction. The camera then adjusts the focus for the subject's predicted position at the instant of exposure. This compensates for the distance the subject moves during the brief delay between the instant you fully depress the shutter button to make the exposure, and the instant the exposure is actually made. If your camera just has single-shot AF, you can still shoot action, but you'll get fewer sharp pictures, because the moving subject might not be at the same distance when the film is exposed as it was when the camera focused on it.
When using predictive AF, track the subject with the camera, press the shutter button halfway down to activate the AF system, then press the shutter button all the way down as the "decisive moment" arrives. This gives the AF system time to acquire the subject and do its predictive calculations. If you just suddenly stab the shutter button at the instant you want to shoot, the AF system might not have enough time to focus on the subject before the exposure is made.
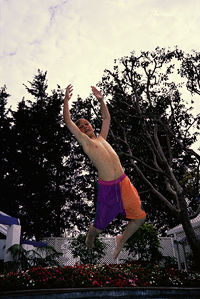
What goes up must come down. There's a brief moment when it hovers motionless before starting back down. This is the moment to shoot—it's the most dramatic "peak action" moment, and since the subject isn't moving, can be captured at a relatively slow shutter speed. This technique is especially handy in dim light. Photo by Ron Leach
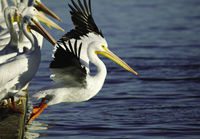
Autofocus systems focus on the closest object to fall within the AF sensor area. When photographing a long-winged bird, this can result in a sharp near wingtip and a not-sharp head. It's probably best to switch to manual follow-focus with such subjects. Photo by Mike Stensvold
It's kinda hard to tell whose hooves are whose here, but the AF SLR sure nailed the focus. And that was three AF SLR generations ago—today's are even better! Photo by Mike Stensvold
Unless your AF camera allows you to select a specific AF sensor as you shoot, it's best to focus action subjects manually when you want to compose them off-center. Photo by Ron Leach
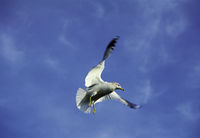
The more you practice action techniques, the better you'll get at shooting action subjects. This pelican lift-off was captured with a Canon EOS-1Ds digital SLR. Photo by Mike Stensvold Practice Makes Perfect
Go to the local park and photograph kids playing and dogs frolicking. Go to an amusement park and try different shutter speeds on the rides. Go out and photograph the action subjects you want to photograph (your kids' sports activities, or whatever you like—one of our editors finds birds in flight a fun and rewarding challenge when he doesn't have a specific assignment to photograph. Practice, and practice some more. It will seem difficult at first, but after a while the mechanical and technical aspects of shooting action will become second nature, and you'll be able to concentrate on composition, emotional moments and all the other things that make for good pictures, action or otherwise. And soon you'll have some exciting pictures to show for your efforts.To save some money, when you first start practicing the techniques presented here—panning the camera, shooting at the peak of the action, focusing and the like—don't put film in the camera. That way you won't waste a lot of film while you get the hang of doing these things and begin to develop a sense of timing (which is the key to any good action picture). Practice focusing (both in AF mode and manually, if your camera permits it) and following the action with the camera. Practice tracking your child or pet around the yard, trying the snap the shutter at just the right moments. Practice panning the camera by tracking cars driving by on a busy street (from the safety of the sidewalk—not from the middle of the street!). When you start to feel comfortable doing these things, put some film in the camera and start taking pictures of these same subjects. When you see your pictures, you'll be able to check on your progress and see which techniques you've got down pretty well and which ones still need some work.
And, remember that there's more to sports than just action. The emotion, the pre-competition psyching-up, the victorious celebration, the agony of defeat—these make for great sports shots, too. Be sure to look for them, and be ready to capture them with your camera.
At big-time pro events, you might not be able to get to the ideal spots to shoot such moments, but you certainly can at sandlot games and events at local parks. And while kids and amateur athletes might not carry the fame of the pros, they're just as delighted in victory, and just as downcast in defeat—and they'll provide opportunities for shots just as dramatic as any made of the pros before and after the big game.
Equipment
All you really need to photograph action is a camera, a lens, and some some film (or a memory card, if you've gone digital). To photograph action like a pro, you need an SLR camera and a long lens. If you're going to shoot indoors or at night, you should also have a powerful external flash unit.Most serious action shooters these days use higher-end AF 35mm or digital SLR cameras (the 6x4.5cm medium-format SLRs are gaining fans, too) and superfast supertelephoto lenses (300mm f/2.8, 400mm f/2.8 and 600mm f/4 are the most popular). These are expensive—the camera bodies cost well over $1000, and the superfast superteles start at more than $2000; a top camera with a 600mm f/4 lens can run more than $10,000! The pros can justify this expense, because they need to produce the highest-quality images to sell in their highly competitive market.
Fortunately, you don't need such costly gear. We've had very good results (and know some budget-minded working pros who make their living) using mid-range AF 35mm SLRs and more-affordable slower telephoto lenses. Your skill at action-shooting is more important than the camera you use—a skilled action shooter using an entry-level 35mm SLR will bring back far better pictures than an unskilled shooter using the most-expensive equipment on the market.
Serious action shooters prefer SLRs for several reasons. First off, eye-level through-the-lens viewing makes it easier to track the action. Next, the interchangeable lenses allow them to frame shots ideally from the sidelines. The fast shutter speeds let them freeze the action. The excellent metering and AF systems quickly and accurately handle the technical stuff so they can concentrate on the action itself instead of on the mechanics of shooting. Built-in motor drives make it easy to shoot great action sequences. And these cameras also give the photographers full manual control of everything when they want it.
Can you shoot action with a point-and-shoot camera? Of course. But do serious action shooters use point-and-shoot cameras? No. Serious action shooters need longer and faster lenses, faster shutter speeds, more accurate predictive autofocusing systems, the ability to focus manually when desired, the ability to see whether or not the camera has focused accurately in AF mode, the ability to set a specific shutter speed when desired, and to know what shutter speed the camera has set in auto mode. So serious action shooters use "serious" SLR cameras.
What about automation? Serious shooters are slow to accept new technology. They have to be convinced that it's better than what they've grown used to. Today's better AF 35mm SLRs offer excellent autoexposure and autofocus systems—so good that most pros have come to love the speed and convenience of automode shooting. Shutter-priority AE lets them select the shutter speed they wish to use, while the camera automatically and instantly sets the corresponding aperture for proper exposure. Continuous predictive AF tracks moving subjects very accurately. It's a lot easier to get sharp, properly exposed action shots today than ever before. But you still have to practice to perfect the techniques
Of course, today's AF 35mm SLRs (except one entry-level model) let you set focus and exposure manually, too. So even old die-hards can enjoy the speed and convenience of automation without giving up total control whenever they want it.
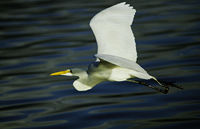
Supertelephoto lenses let you fill the frame with subjects you can't approach closely. While pros prefer superfast (and superexpensive) superteles, you can get great shots with far-less-costly slower superteles and tele zooms. This egret was captured with an under-$600 200-400mm zoom at its 400mm setting. Photo by Mike Stensvold
If you don't have a superlong lens, you still can get great action shots. Here, a not-so-long lens let the photographer include the airshow performer's smoke pattern as a compositional element. Photo by Mike Stensvold
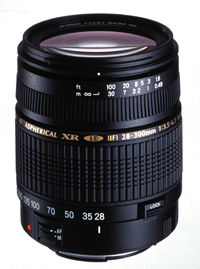
A wide-ratio telephoto zoom like this Tamron AF28-300mm XR Ultra Zoom provides lots of shooting flexibility when you can't move around (for example, when you're shooting from a seat in the stands).
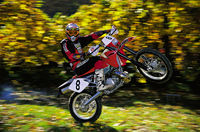
You can use fill-flash with a slow shutter speed in daylight to produce interesting effects. Higher-end camera/flash systems let you adjust the amount of flash fill, from a stop over the ambient light to several stops less. Photo by Ken Faught / Dirt Rider Magazine
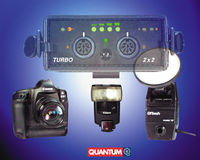
An auxiliary power pack, such as this Quantum Turbo 2x2, can provide more flashes per charge—very handy in the field. This unit can also power the camera. Lenses
Like all serious photographers, professional action shooters use the lens focal lengths they need to get the pictures they want. For sports where they can't get right up close to the action, this generally means the aforementioned superfast supertelephoto lenses—the 300mm f/2.8, 400mm f/2.8 and 600mm f/4. These lenses bring distant action to them, while allowing them use faster shutter speeds to "freeze" it, and slower films for better image quality. But the superfast superteles are quite awkward and bulky, and as noted, very expensive.Non-pro shooters on a budget can make do with slower long lenses by using faster films. Popular lens choices among those of us who can't afford the exotic pro optics include 300mm f/4 and 400mm f/5.6 superteles, and 75-300mm and 100-400mm or 200-400mm zooms. Another great "economy" combo is a 200mm f/2.8 lens plus 1.4X or 2X tele-converter (which convert the 200/2.8 into a 280mm f/4 or 400mm f/5.6, respectively). Today's ISO 400 and 800 color-print films are excellent, so you can get some great images with the slower-lens/faster-film combinations. Mirror lenses are another economy option—they're not as crisp as regular supertelephotos, and are slower (500mm f/8 is a common example), but they cost a lot less, are much shorter, and can focus much closer.
Of course, there's a lot of action that can be better captured with shorter focal lengths—if you can gain close access to the action. (As mentioned earlier, you're more likely to be able to do that at amateur events at a local park or recreation area than at pro events.) When you move close with a wider-angle lens, you expand the perspective and really give the viewers the sense that they're part of the action. Shooting from farther away with a longer lens flattens perspective, a less-dynamic effect, although it still brings the viewer into the action. Be careful when shooting at close range, though—don't get in the way, or hurt.
Flash
Pro action shooters use powerful high-end electronic flash units, because that's what's needed to light subjects at typical action-shooting distances. A built-in flash just isn't going to cut it beyond around 10-15 feet. So your choices here are: (1) restrict your action shooting to outdoors in daylight; (2) use superfast films (remembering that anything past ISO 800 is going to be quite grainy); or (3) buy, rent or borrow a serious flash unit.How far away will a given flash unit let you shoot? Divide the flash unit's guide number for the film speed you're using by the maximum aperture of the lens you'll be using, and you'll know. For example, if you're using ISO 100 film and a 400mm f/5.6 lens with a flash unit that has an ISO 100 guide number of 112 (in feet), 112 divided by 5.6 = 20 feet. If you want to shoot flash pictures from farther away, you need a faster film, a faster lens, or a more-powerful flash unit (hint: it's a lot cheaper to switch to faster film).
Of course, power isn't the only flash feature that's useful for action work. TTL automatic exposure control is a big help. With TTL flash, all you have to do is shoot; the camera and flash circuitry automatically adjust the flash output for proper exposures at any aperture (within the flash unit's effective range). There's no need to measure shooting distances and calculate f-stops. Automatically balanced fill-flash (Nikon calls its version 3D Multi-Sensor Balanced Fill-Flash; Canon calls its version E-TTL flash) automatically balances flash and existing-light exposures so that the flash-lit nearby subject and the ambient-lit background both come out looking natural in the picture.
Slow-sync flash employs a slow shutter speed to record detail in a dim background while the flash properly exposes the nearby subject. Rear-sync flash is handy for motion special effects. With normal front-sync flash, the flash fires at the start of the exposure. If you make a long exposure of a subject moving across the image plane, the flash burst will sharply record the subject at its starting point, then the ambient-light exposure will record a ghost streak as the subject moves across the picture. The result is an image in which a "speed streak" appears in front of the subject—an unnatural effect. With rear sync, the flash fires at the end of the long exposure, so the ghost-image "speed streak" appears behind the subject in the picture—a more natural effect. Not all cameras offer rear sync, so if you think you might want to use this technique, get one that has it.
While photographers often refer to electronic flash units as "strobes," true strobes are flash units that fire repeatedly at a rapid rate. Many higher-end flash units offer a repeating "strobe" mode, and you can use this to produce another action special effect: several points in the movement frozen in the same picture. A couple of things to keep in mind about strobe: First, the flash output is very low in strobe mode, so you have to put the flash unit very close to the subject. Second, the background will receive exposure from each burst of the strobe, and could become overexposed. To avoid this, position the strobe so that it lights the subject from the side, and thus doesn't illuminate the background—or shoot in a large unlit area outdoors at night, where there's nothing in the background.
High-speed sync is another flash feature that sounds great for action—with it, you can shoot flash photos at higher than normal shutter speeds, especially handy for fill-flash in sunlight. But as is the case with strobe mode, the flash fires at very low power in high-speed sync mode, so the flash unit must be positioned very close to the subject. (And exception is leaf-shutter medium-format cameras, which sync at all shutter speeds even with the flash at full power. But these cameras have fairly slow top shutter speeds—generally, 1/500 or thereabouts.)
With front sync, the flash fires at the beginning of the exposure. The result, if you make a long exposure of a subject moving across the frame, is a subject preceded by ghost-image "speed streaks"—an unnatural effect (top). With rear sync, the flash fires at the end of the exposure, so the ghost-image streaks appear behind the subject—a more-natural effect (bottom).
For action shots in dim lighting, a faster film is needed. You can generally push the film speed a stop or so if necessary. But the rule of thumb is to use the slowest film that will let you get your shot (i.e., that will let you shoot at the required shutter speed and lens aperture in the existing conditions), because faster films are grainier than slower ones. Photo by Ron Leach
Slow Fujichrome Velvia is fine for action work when there's enough light. Here, sunlight and fill-flash did the deed. Photo by Karel Kramer / Dirt Rider Magazine
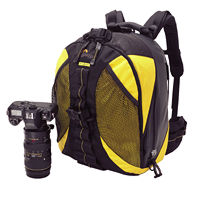
Action work is rarely done in a studio, so you need some means of carting your gear into the field. A good camera bag is essential. This Lowepro Dryzone 200 camera backpack is easy to carry (it leaves both arms free), and is waterproof—in fact, it floats.
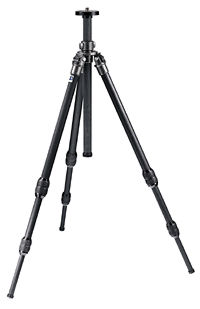
A sturdy yet lightweight tripod (such as this carbon-fiber Gitzo Mountaineer from Bogen) will hold a long lens steadily so you can get sharper shots. Action pros use tripods quite frequently.
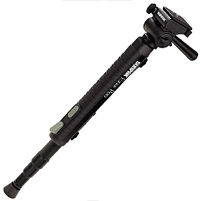
A monopod (like this Sunpak Ezee Pod) can help steady a long lens almost as well as a tripod, but is far easier to carry, and is sometimes permitted where a tripod isn't. Sometimes its useful to be able to use the flash unit off-camera. Most higher-end SLRs and flash units permit you to do this, either by means of an extension sync cord, or wirelessly. You can also use an on-camera (or even built-in) flash to fire an off-camera unit via a slave (an electronic eye that fires the unit connected to it when it "sees" the flash of the camera-connected unit). Using the flash off-camera gives you more lighting flexibility (you're not stuck with that flat on-camera flash look), and can eliminate red-eye in action shots of people (by increasing the distance between the flash and the lens axis). The brief flash duration will freeze fast action. With automatic or adjustable-power manual units, you'll get the briefest durations at close shooting distances. Insect and bird photographers use flash at very close range because the resulting durations—as short as 1/30,000 second with some units used at their closest operating distance—can freeze just about any action, while the power at such close range is sufficient to let them stop the lens down for increased depth of field. (Note: At maximum range, flash units have longer minimum durations—1/1000 or longer—but that's still short enough to freeze much action.)
For long-range telephoto flash photography, you can extend the range of your flash by attaching a device like the Project-A-Flash (805/528-0701) over your flash unit. This is a large tube containing a Fresnel lens that focuses the light from the flash, narrowing the angle of coverage to about the view of a 300mm lens, but greatly extending the range—if your flash unit lets you shoot up to 40 feet away at f/4, attach the Project-A-Flash, and you can shoot up to 114 feet away at f/4.
Film
You can use your favorite films for action photography. Sports pros use whatever films they need to get the pictures they're after. The slower films are sharper and finer-grained, and produce richer colors. But they require lots of light. Today's faster print films (ISO 400 and 800) are excellent, and frequently used by pros. Films above ISO 800 do suffer a noticeable lessening of image quality—they're grainier and less sharp, and colors aren't as rich—but can be useful when you need that much speed.The pro action photographers at our sister publication Dirt Rider magazine (who provided the motorcycle-action photos accompanying this article) really like Fujichrome Velvia (ISO 50, but they rate it at EI 40) for outdoor and close-up flash shooting. We've had good luck with the ISO 100 color-slide films (Fujichrome Provia 100F and Kodak Ektachrome E100VS, for example) whenever the light level permits their use. We push them to EI 200 when we need an extra stop of speed. If we need more speed, we generally switch to ISO 400 and 800 color-print films. In black-and-white, we like the ISO 400 chromogenic films, and go to the superspeed films such as Kodak T-Max P3200 and Ilford 3200 Delta when we need that much speed.
Accessories
Professional sports photographers need sturdy tripods to support their bulky supertelephoto lenses. And a tripod is always a good idea when it's possible to use one, because it can hold the camera steadier than we can. Using a tripod is not always possible (or permitted—for example, at the sideline of a football game, a tripod would be a hazard). But for the sharpest photos, use one whenever you can—especially when shooting with long lenses.A monopod is a great alternative to a tripod. In effect a tripod leg with a mount for the camera at the top, it's not as steady as a tripod, but it's steadier than hand-holding the camera and long lens, and is sometimes permitted where tripods are not.
A good tripod head is important for action work. It should allow you to pan the camera smoothly to track a moving subject, while holding the camera steadily along the other axes. Thus, a three-way pan-tilt head is generally better for action than a ball head is. Some monopods come with a head, but it's not hard to pan a camera that is attached directly to a monopod. A quick-release mount is important, so you can quickly remove the camera for hand-held shooting, and attach it for tripod-steadied shots.
For serious action shooting, you probably have a lot of gear—a camera body, several lenses, a flash unit, lots of film, etc. So it's nice to have a convenient means of carrying it, and keeping it all together as you shoot. A rugged soft camera bag is probably the best choice for this. A hard case provides more impact protection, but is bulkier, and might not be permitted on sidelines. A photo vest holds lots of stuff and keeps your arms free, and is a great idea unless you have some lenses that are too big and heavy to carry that way.